As of March 2025, there's now a built-in Direct Integration for Azure. It pulls the same information as this script, is automated, and allows for filtering on things like Resource Group, Subscription, and more. To get started with the Direct Integration, navigate to your Dashboard, then click Services > Direct Integrations on the top menu. Click the Microsoft Azure integration in the list, and the configuration wizard will open. Written instructions and a video link for the integration are located on the right side of the wizard.
Azure doesn't send email notifications for backups and replication jobs. This script can be used to pull all jobs from the Recovery Services Vaults in your Azure Subscription and send their status to CheckCentral. It's recommended to run this script daily.
- In your Azure Portal, navigate to your Azure AD page.
- In the left pane, click "App registrations."
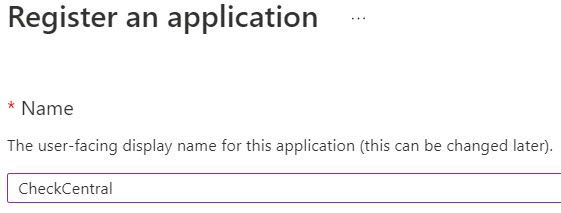
- Click "New registration."
- Give it a name (e.g. CheckCentral), then click the Register button. After it finishes creating, you'll be on the page for the App Registration.
- In the left pane, click "Certificates & secrets."
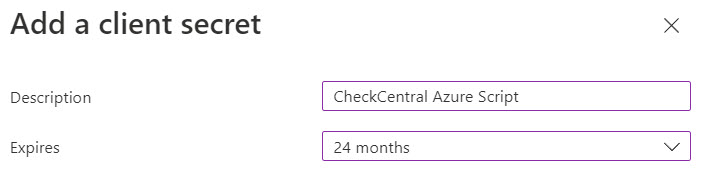
- Click "New client secret."
- Enter a description (e.g. CheckCentral Azure Script) and set the expiry time. Note that the max expiry time is 24 months, so you'll need to re-generate the token every two years (or less if you choose a shorter expiry time). Click the Add button.
- Click the Client secrets tab and copy the string from the "Value" column (not the Secret ID). After navigating away from this page it won't be shown again, so make sure you've got it saved somewhere for the script setup section of this guide.
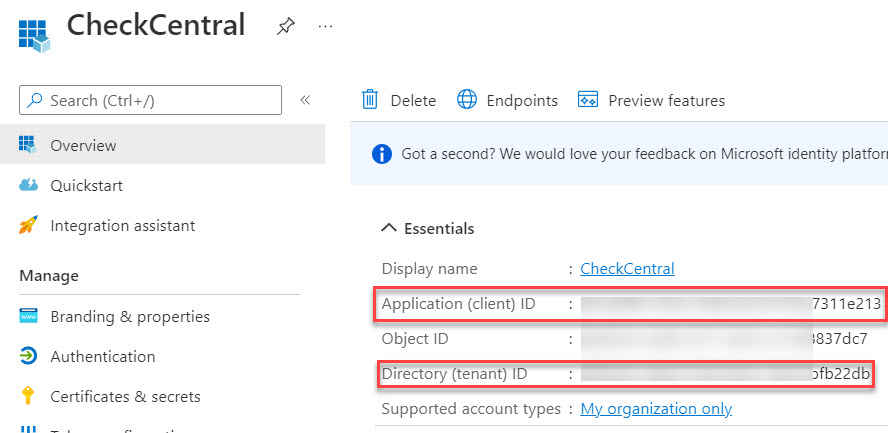
- In the left pane, click "Overview."
- Copy the "Application (client) ID" and "Directory (tenant) ID" values and save them somewhere for the script setup section of this guide.
- On the top-left of the portal, click Home, then click Subscriptions.
- Copy the "Subscription ID" and save it somewhere for the script setup section of this guide.
- Click the Subscription name, then in the left-pane, click "Access control (IAM)."
- Click the "Role assignments" tab.
- Click "Add" and select "Add role assignment."
- Click the "Reader" role in the list to select it, then click the "Members" tab.
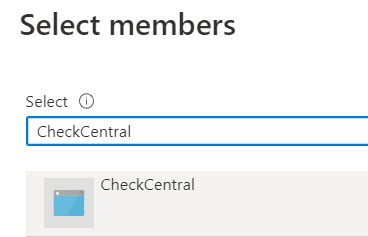
- Click "Select members," type "CheckCentral," and select the App Registration you created earlier in the guide. Click "Select."
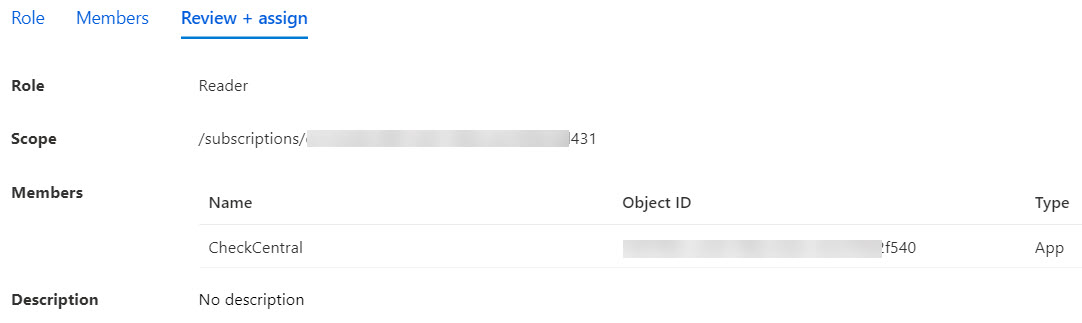
- Click "Review + assign." Confirm that the Role is "Reader" and that you've selected the correct App Registration.
- Click "Review + assign" again to save the Role Assignment.
- The Azure configuration is now complete. In the next section, you'll configure your CheckCentral API token.
- On your CheckCentral dashboard, go to Organization > API.
- Click "Add Token" next to the "API Tokens" header (not "User API Tokens").
- Give the token a name, e.g. "Acme Widgets Azure Backup and Replication Script."
- Select "CreateActivities Only" in the Access Level drop-down and click Save.
- Copy the token and save it somewhere for the script setup section of this guide.
For multiple instances, consider using unique API keys. If at a later date one needs to be revoked, it will then only impact a single instance.
- Paste your CheckCentral API token into the $ccOauthToken variable.
- Paste your Azure Subscription ID into the $subscriptionId variable.
- Paste your Azure Directory (tenant) ID into the $tenantId variable.
- Paste your Azure CheckCentral App Registration's "Application (client) ID" into the $applicationId variable.
- Paste your Azure CheckCentral App Registration's "Client secret" into the $secret variable.
- Save the script and run it to confirm that the activities get created in CheckCentral. The activities will be unmatched and can be found either via the Activities menu or clicking the unmatched messages link in your dashboard's Current Issues section.
- Configure this script to run on a machine somewhere as a regularly scheduled task. (Daily in this example)
- View your unmatched messages in CheckCentral, either via the Activities menu or clicking the unmatched messages link in your dashboard's Current Issues section.
- Click the "[create check]" link next to the activity. This will take you to the check creation area.
- Leave the name as the default, and choose a Check Group from the drop-down, then click Next to advance to the Schedule tab.
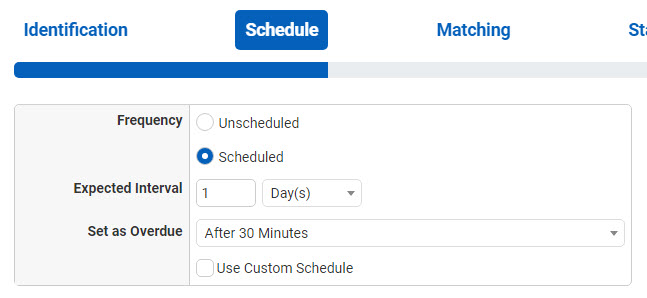
- For this guide, we'll assume that you're going to run the script every day. In order for CheckCentral to notify you when the Check is overdue (e.g. if the script didn't run as scheduled), you'll want to configure the "Expected Interval" setting to "1 Day."
- Click Next to advance to the Matching tab.
Notice that there's nowhere to assign the time of day that the email is expected. This is because CheckCentral will automatically adjust the expected time based on when the last email arrived. If your script runs at 9am and finishes at 9:01am today, then the next email will be expected at 9:01am tomorrow.
In case the script runs slightly late one day, you can configure the Check to only notify you if the email is late by more than a certain amount of time. We'll leave it at the default of 30 minutes for this example, which means that you won't get an "Overdue" notification until 9:31am tomorrow. This allows an extra 30 minutes for the script to run before any action is taken.
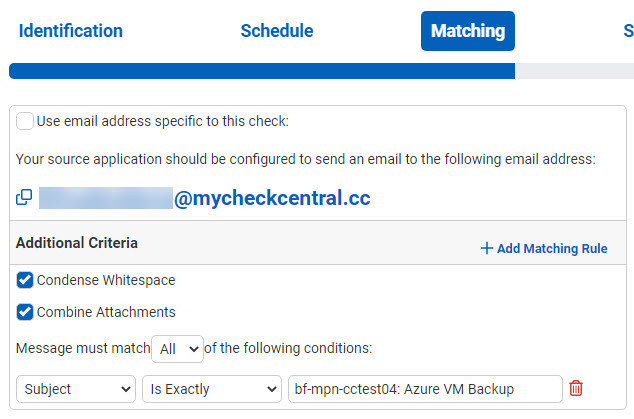
The activity that the script creates will include the VM name and the job type (backup or replication) in the subject line, so you'll match on the subject when configuring the check.
- On the Matching tab of the wizard, leave the defaults and click Next to advance to the Status tab.
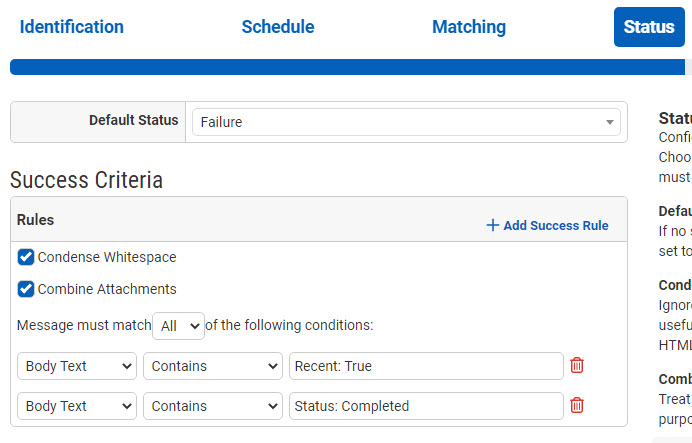
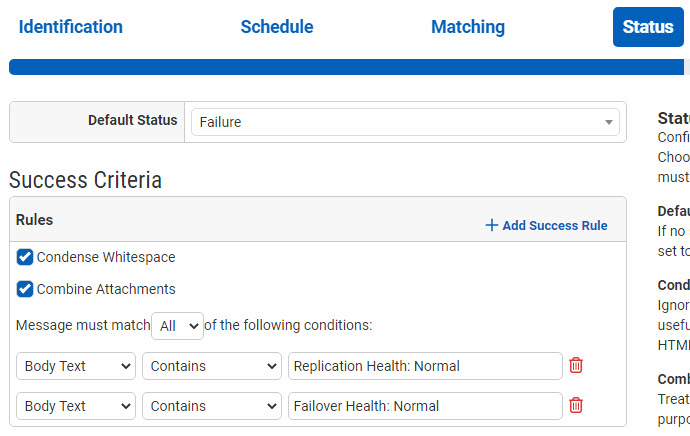
IMPORTANT:
The success rules will be different depending on whether it's a backup activity or a replication activity. Use only the backup rules, or replication rules below, depending on whether the activity is a backup or a replication activity.
For a backup activity ONLY, use these conditions:
- On the Status tab, click "Add Success Rule."
- Set the rule to Body Text Contains
- Click "Add Success Rule." again.
- Set the rule to Body Text Contains
- Click Next when you're done configuring the success conditions to advance to the Notifications tab.
For a replication activity ONLY, use these conditions:
- On the Status tab, click "Add Success Rule."
- Set the rule to Body Text Contains
Replication Health: Normal
- Click "Add Success Rule." again.
- Set the rule to Body Text Contains
- Click Next when you're done configuring the success conditions to advance to the Notifications tab.
- Configure your Notifications for this check, then click Next to advance to the Save tab.
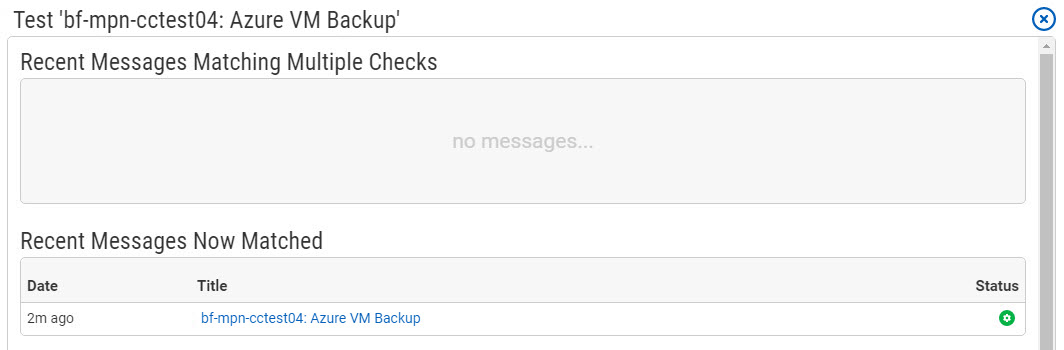
- On the Save tab of the wizard, click the Test button on the lower-right to confirm that the activity now matches the check. If the check configuration is correct, you will see the unmatched messages appear in the "Recent Messages Now Matched" section.
- Close the Check Test dialog, then click Save Check.
You can now repeat the check setup steps using the unmatched activities for any other VMs that were found in the vaults and sent in by the script.
As always, if you run into any trouble configuring your Checks, please feel free to
contact us and we'll be glad to help out.
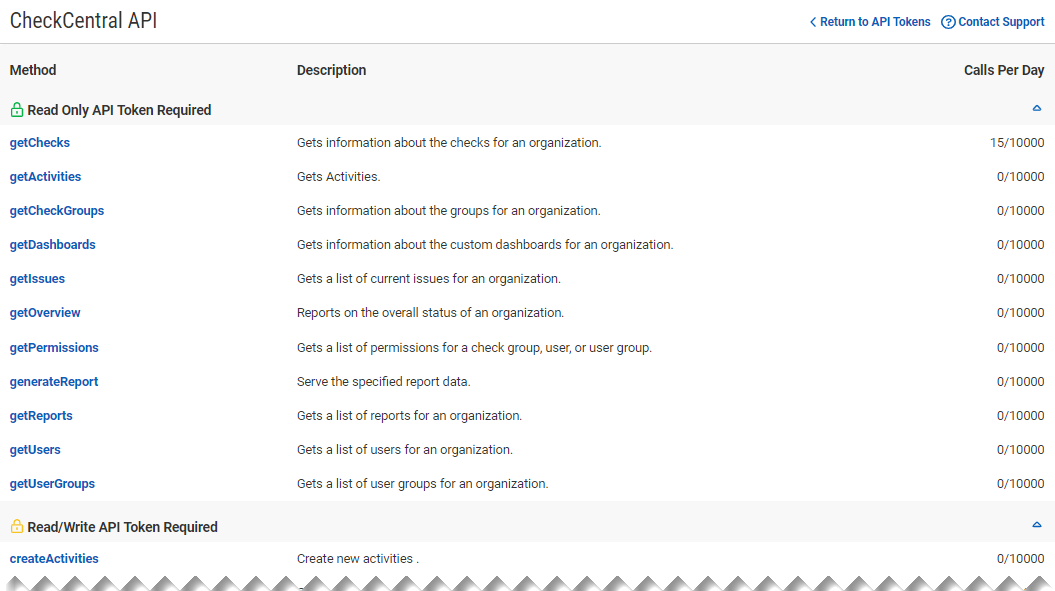
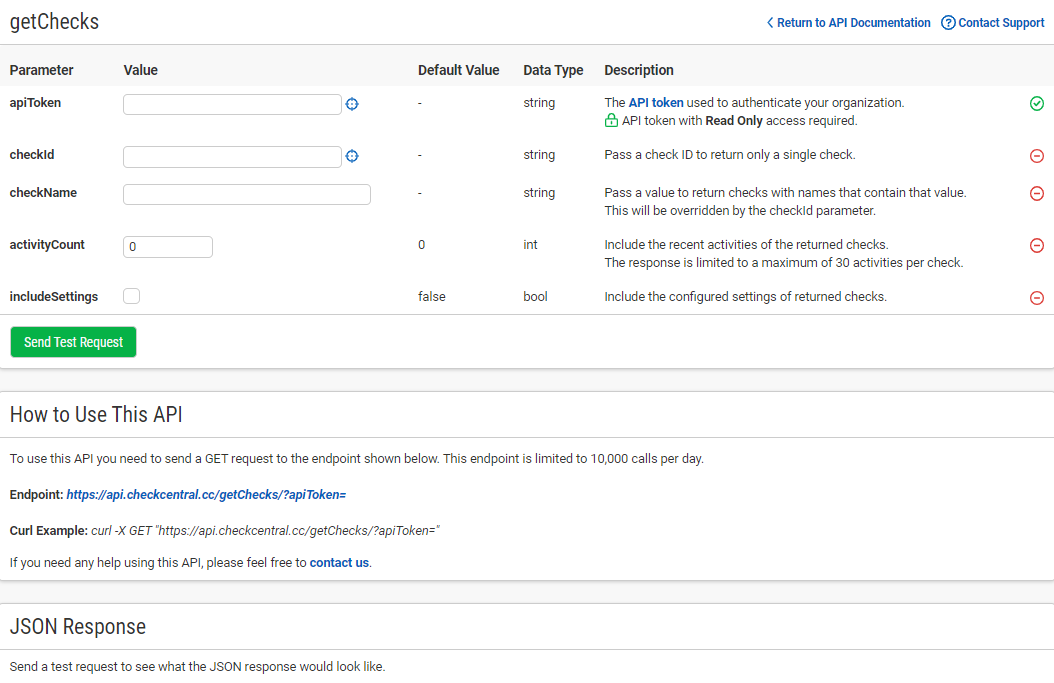
A full list of API Methods are available via the API page under your CheckCentral organization.
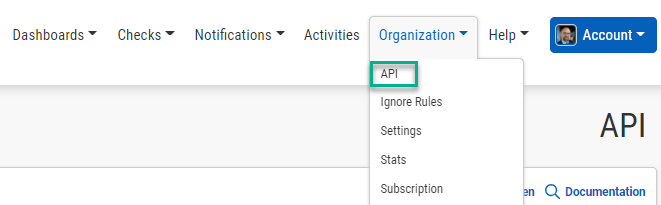
Log in to your account. Click "Organization" from the main menu, then "API."
Here you'll see the list of Methods available, their permission requirements, their purpose, and the call limit per day.
Click on any of the Methods to see a testing area with parameter requirements and an example of usage. Populate the fields and click "Send Test Request" to see the JSON Response.
CheckCentral Monitoring consolidates and simplifies backup, system, and software email updates into a clean, graphical dashboard, bringing peace of mind to IT administrators of SMBs, Enterprises, and MSPs.
To learn more about CheckCentral, visit:
https://www.checkcentral.ccBinary Fortress has spent 19 years in pursuit of one goal: create software to make life easier. Our software ranges from display management and system enhancement utilities to monitoring tools and digital signage. IT administrators, professional gamers, coffee-shop owners, and MSPs all rely on Binary Fortress to make their days better, and their lives easier.
Copyright © 2007-2026 Binary Fortress Software, all rights reserved.
The Binary Fortress logo is a trademark of Binary Fortress Software.
The CheckCentral logo is a trademark of Binary Fortress Software.
Binary Fortress Software
1000 Innovation Drive, Suite 500
Kanata, Ontario, Canada
K2K3E7
https://www.binaryfortress.com