This document provides you with real-world example Checks and best practices when creating your own.
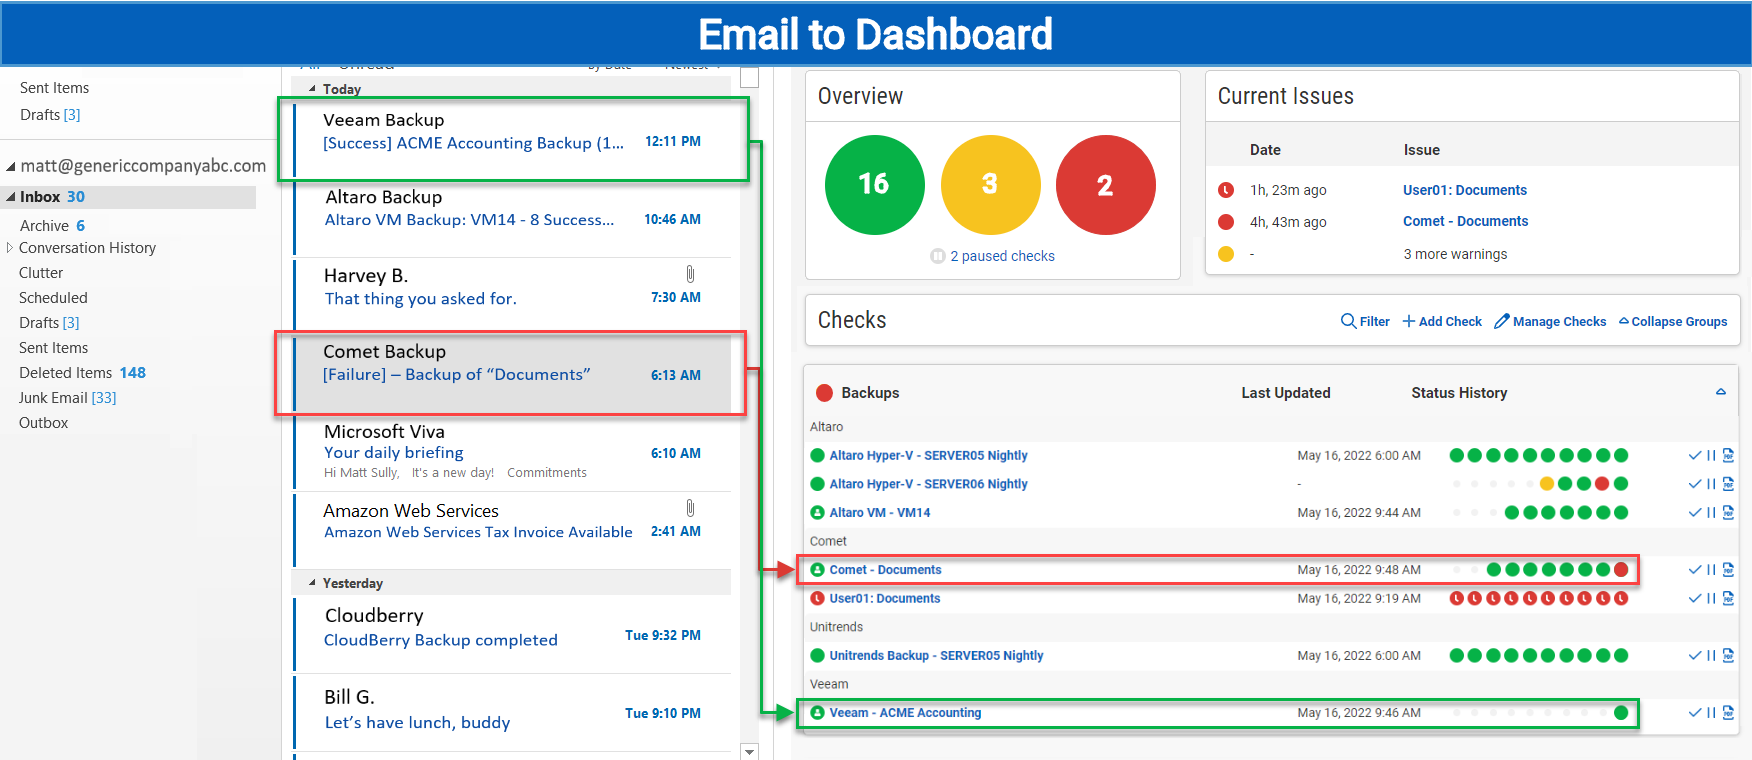
CheckCentral converts all your backup and software email notifications into a simple-to-read status dashboard.
To begin this conversion process, you'll need to configure email parsing entries for each notification email you receive. In CheckCentral, these entries are called Checks.
Before creating your Checks, some preparation is advised. You'll need:
- Sample emails from each type of system or service you wish to monitor that normally sends notification messages (e.g. Backup software sending job statuses). Though not necessary to create a Check, forwarding these sample emails directly to your organization's "mycheckcentral.cc" address (found in Settings under the Organization tab in the main menu) prior to Check creation can be helpful for guidance and testing. *Note that the address is customizable. Future address customization will negate these initial message matches.
- Access to the systems/software sending notification emails so you can update the destination email addresses.
- A list of groupings/customers under which the Checks will be organized. If you use a ticketing system, you may be able to import your customer list into CheckCentral as Check Groups prior to check creation. See Setting up External Ticketing Systems if you wish to begin there.
- Access to your ticketing system, if applicable, for integration with CheckCentral.
- Organizational access list you'll want to add as CheckCentral users, and methods of desired notification for each (i.e. email, text, messaging software, etc.). Clients can be given limited access to custom, exclusive Dashboards and/or relevant reports for their Check activity.
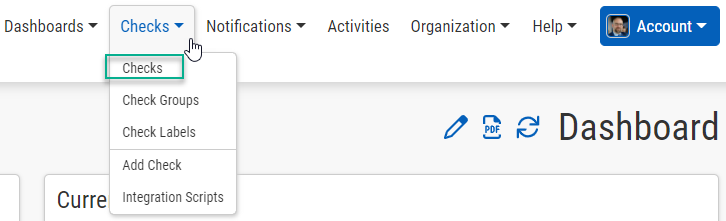
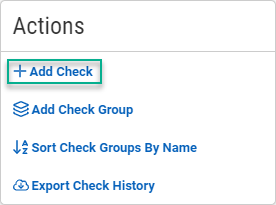
Checks can be added from various locations in the CheckCentral interface, from the Dashboard, Checks page, Activity page, and the Check Group details page.
Wherever you are, begin by clicking "
Add Check
."
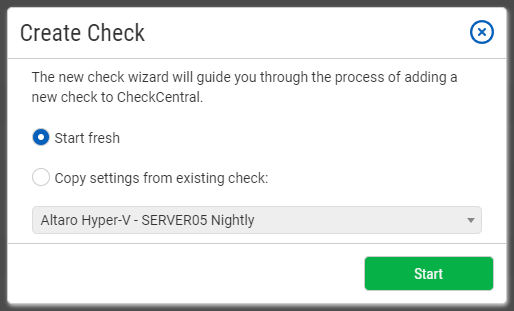
A prompt will display for the Check wizard, which will walk you through the steps of Check creation. Previously-created Checks are available to use as templates, making the process easier when creating similar Checks in the future. For your first Check, or any Check with unique configurations, select "Start Fresh," and click "Start."
There are 6 steps to creating a Check.
To navigate through the process, use the buttons at the bottom of the page or click the tab for the step along the top. Clicking "Switch to Advanced Mode" offers a long-form view of the same process.
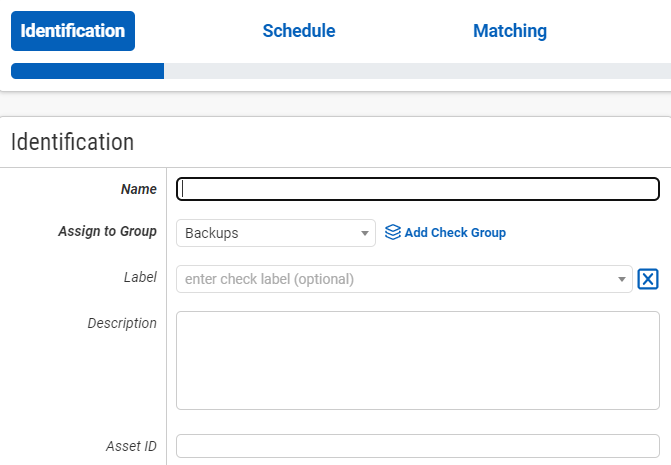
Name your Check something meaningful at a glance, such as the system or server name, the geographical location of the source, its owner, the subject line of the notification email, or a combination of these elements. The name, however, is not the only means of identification.
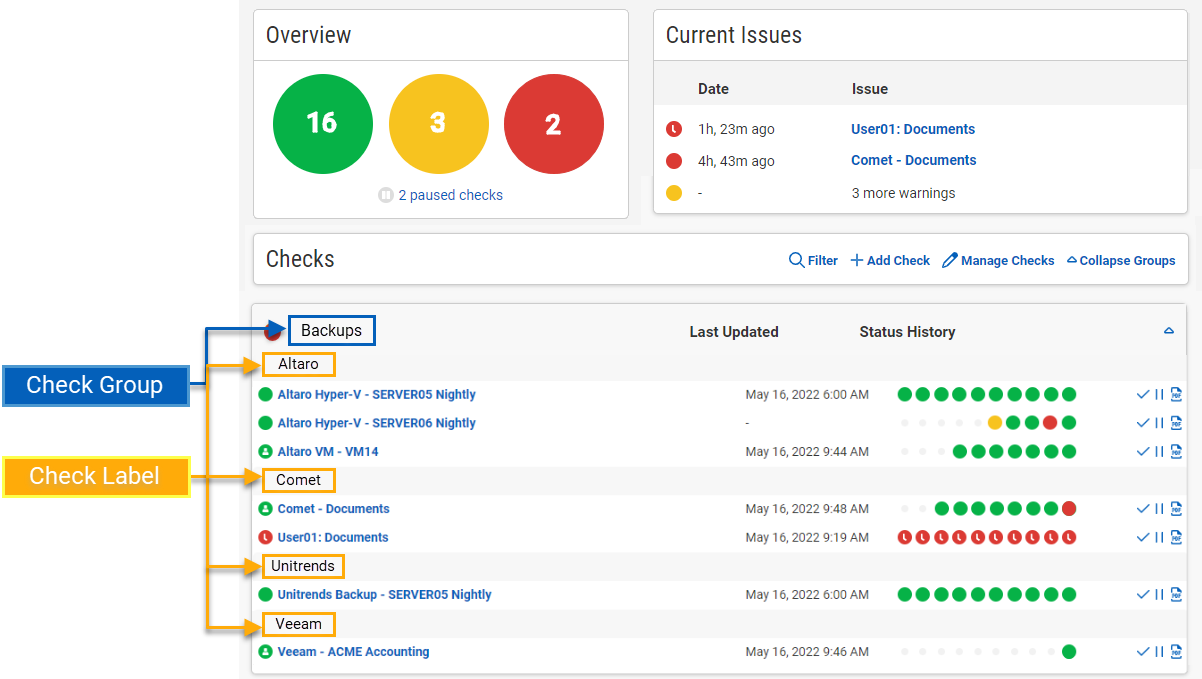
Check Groups and Labels add detail to each Check for better organization and association. In the Dashboard, Checks are grouped by their Check Group and then by Check Label. A Check Group used by an MSP, for instance, may be the name of a particular client, grouping all that client's checks together. The Check Label could be the name of the backup software, creating a subset of similar checks within its group.
New groups can be added during this identification step by clicking "
Add Check Group
," then typing the name, description, choosing its order, and clicking Save. New labels are added by simply typing the label name into the dropdown text field. Previously created groups and labels can be used again and will be listed in their dropdowns. Any further details can be added to the Description field.
The Asset ID is used exclusively with certain ticketing systems and is not required for Checks. Asset ID details and ticketing systems are more fully covered by other documents. (e.g.
Halo Integration (asset ID).)
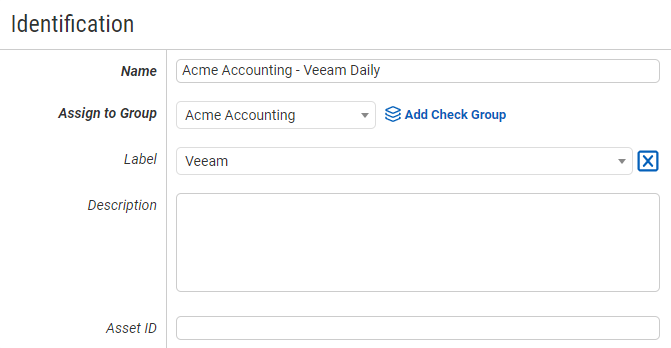
We'll use a Veeam backup notification as the basis for our example moving forward. Here we've named it "Acme Accounting – Veeam Daily," added it to our Acme Accounting Check Group, and given it the Veeam Check Label. We will not be adding a Description or using the Asset ID in this example.
Use a meaningful and informative name for your Check, leveraging Check Groups and Check Labels for further clarification.
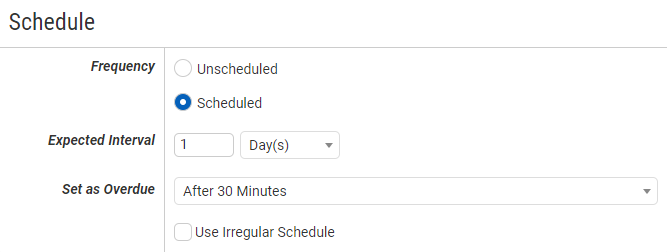
After you've identified your Check, you'll need to set a Schedule. The Schedule is simply the expected interval for your notification email. If the associated email is sent daily, this Check will expect an email every day.
The initial expectation time is set by the first email message that is received and processed by its Check. (For example, if a notification email arrives at noon and its Check is set for every half hour, it will expect another notification email at 12:30.)
For emails sent at regular intervals, keep the Frequency set to "Scheduled." Intervals can be set for Minutes, Hours, Days, Weeks, and Months.
If you have a job with an irregular schedule (e.g. a job that runs hourly but only between 8am and 5pm), you can enable the "Use Irregular Schedule" checkbox and set the time range so that CheckCentral won't report the Check as overdue during the hours where backups are not expected to take place. This option is only for special cases, most of the time leaving it disabled is recommended.
If the expected email does not arrive at its set interval, the Check will mark it as Overdue. The Overdue status will be in a Warning state (
) until the Set as Overdue time is reached. Once that set time elapses, the Status is set to Failure (
). This setting by default is "After 30 Minutes." It can be altered to variables ranging from "Immediately" to "One Week."
For this example, we'll use the Schedule defaults.
In most cases, the Scheduled defaults are applicable. When in doubt, use these default settings.
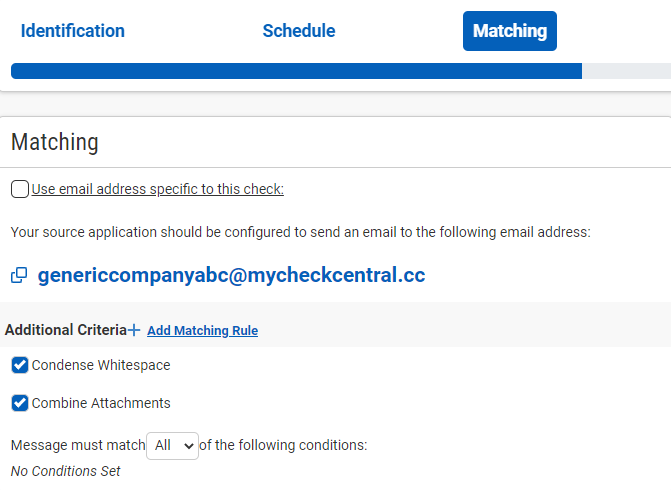
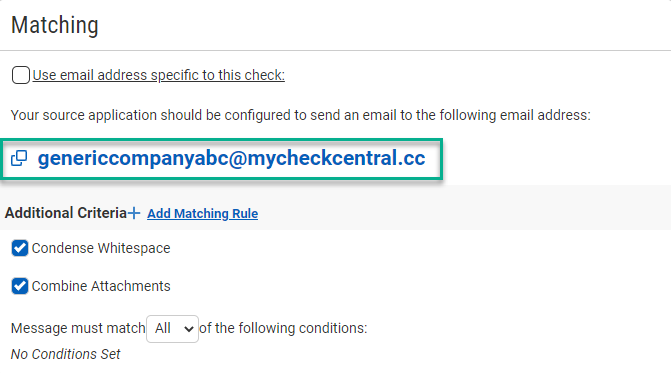
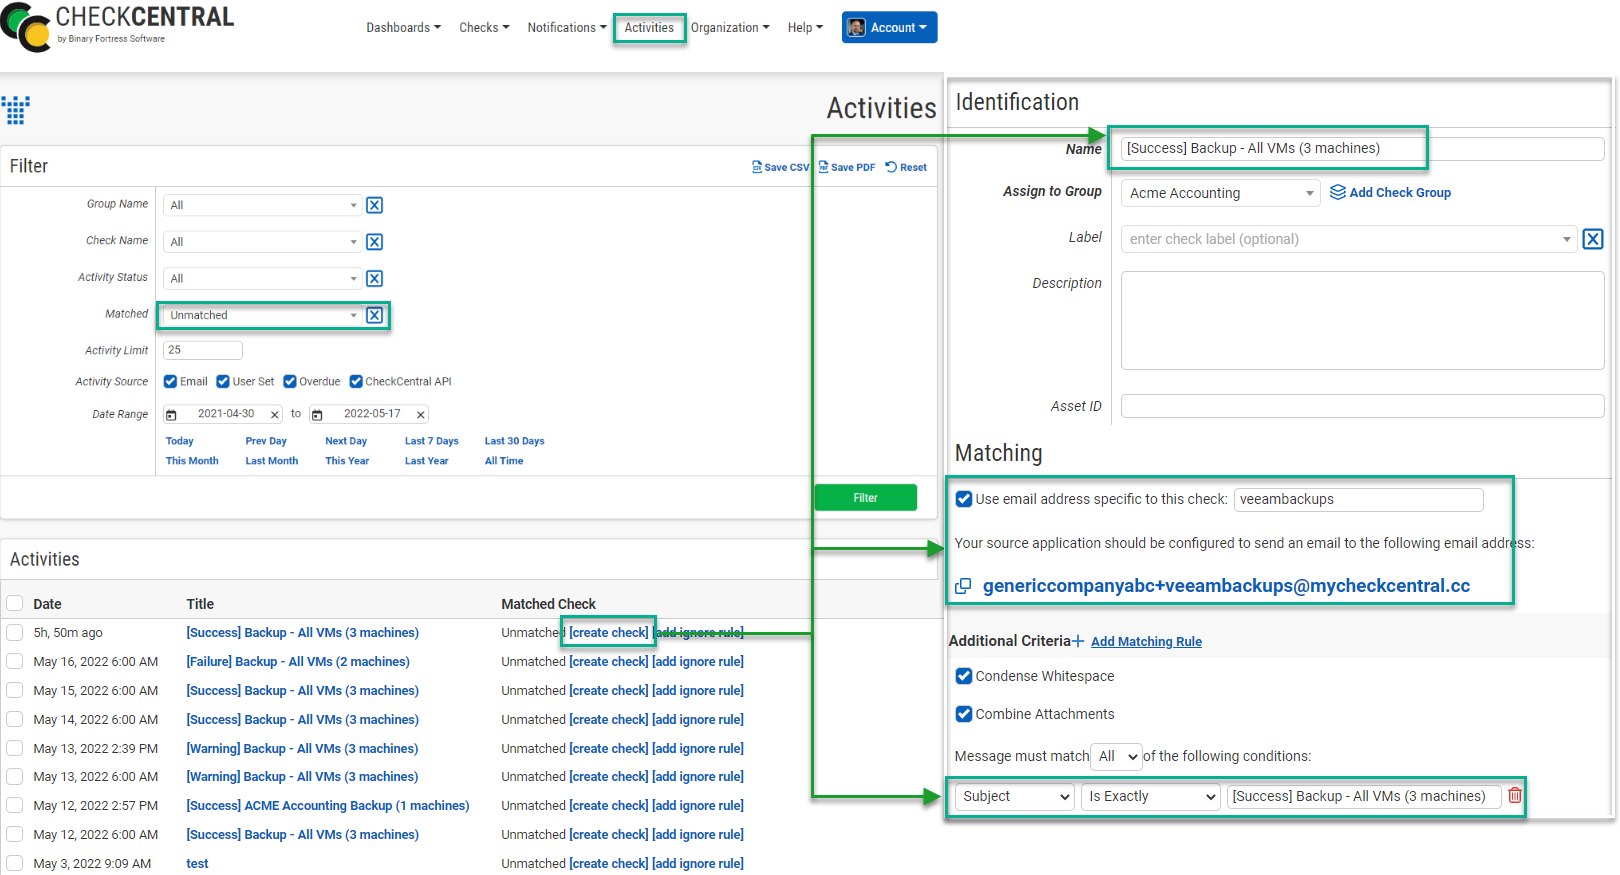
The Matching step is what matches a notification email to its specific Check. It's also where you'll set the notification's CheckCentral destination email. For CheckCentral to parse notification emails, they must be sent to a "mycheckcentral.cc" address. By default, the email address is [your organization name]@mycheckcentral.cc.
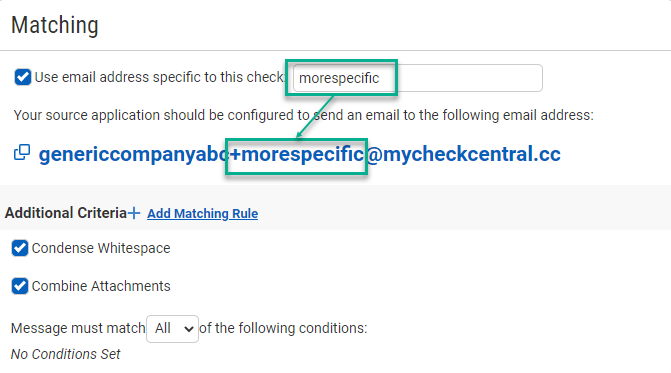
This email address can be used for all your Checks or modified with additional text for unique destination addresses by enabling "Use email address specific to this check."
A unique address per check simplifies the matching criteria configuration as each notification source would then have a one-to-one relationship; Every notification email when sent to a unique email will match to its own Check.
Not every situation allows for this type of configuration, however. If you choose to forward notification emails to CheckCentral, the original notification source may be lost, which then requires additional Matching criteria. This criteria is created by clicking on "
Add Matching Rule
," which adds new fields below. This action can be repeated for multiple rows.
Matching can be on the Subject, Body Text, or even the email attachments. To, From, CC, and Originally To email addresses can also be used for matching. Multiple matching rules can be used in combination to achieve the best and most reliable match with an "All" or "Any" condition setting, located above the Matching Rule fields.
A variety of dropdown selections expand your matching possibilities, including complex and regex matching options. Help icons
will appear for both options to guide you further in their use.
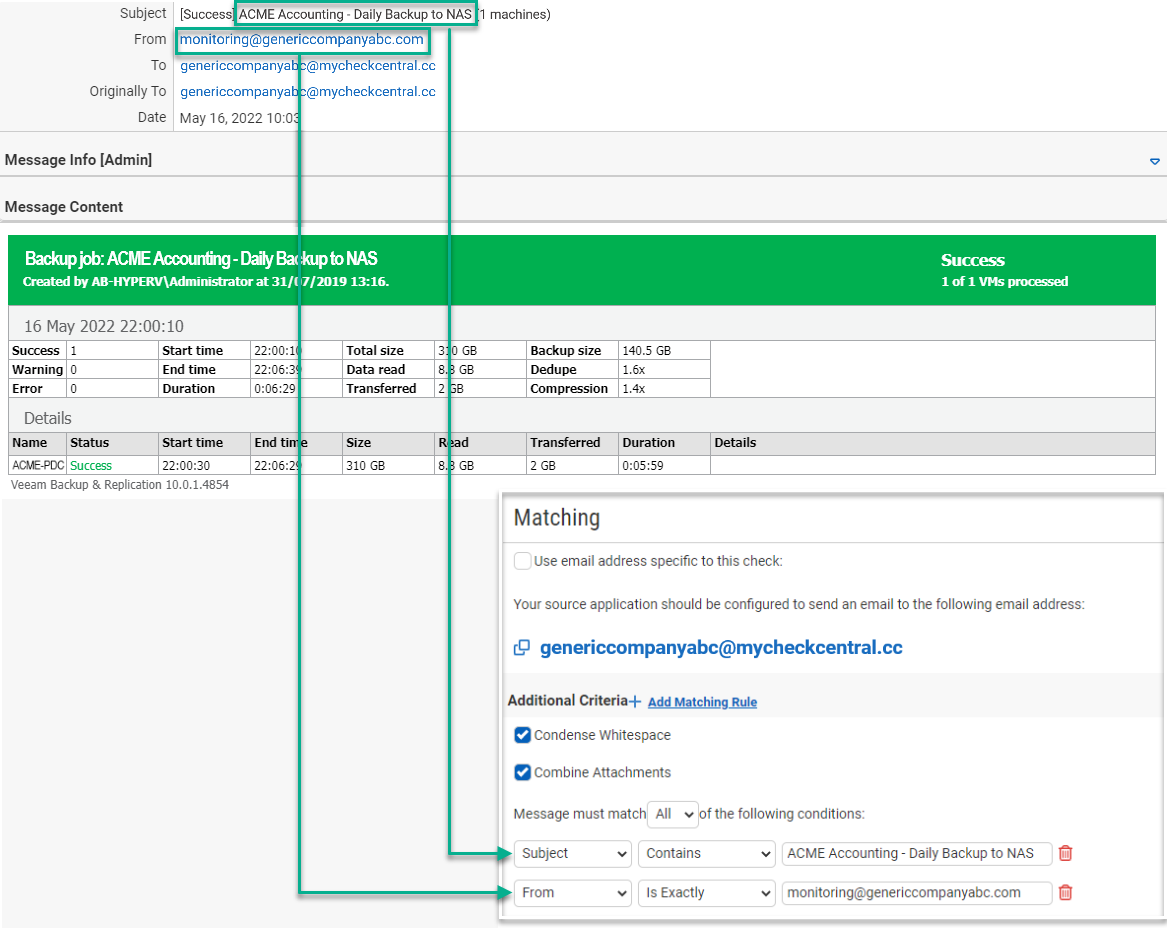
For this example, we'll add criteria to match on the content of the incoming email. Veeam backup notification formats typically follow this pattern: "[%JobResult%] %JobName% (%VmCount% VMs) %Issues%" We can match each message using the job name ("%JobName%"), as it will always be included in the subject of the email and works for jobs including single or multiple VMs/systems.
We'll match on that name by clicking "Add Matching Rule," selecting "Subject," "Contains," and typing "ACME Accounting - Daily Backup to NAS" in the text field.
We'll add a second Matching Rule on the sending email address. In this example we'll be forwarding notification emails from a general monitoring catch-all email. For this second rule we select "From," "Is Exactly," and type the text "monitoring@genericcompanyabc.com."
We will leave Condense Whitespace and Combine Attachments enabled for this example.
Use matching elements that are consistent with and exclusive to the notification emails for each source. Don't use anything regarding status (i.e. "Success") at this point in creating your Check. Don't use terms that may appear in other irrelevant emails from the source (e.g. The email only pertains to administrative updates).
If there is risk of your matching text being duplicated across other source emails, using a unique CheckCentral email will be the better choice for one-to-one identification. Though it is unlikely that anyone will send email to your CheckCentral addresses, including "From" email addresses will further guarantee the Check is tied to the proper notification email. In most cases, it is best to leave Condense Whitespace and Combine Attachments enabled.
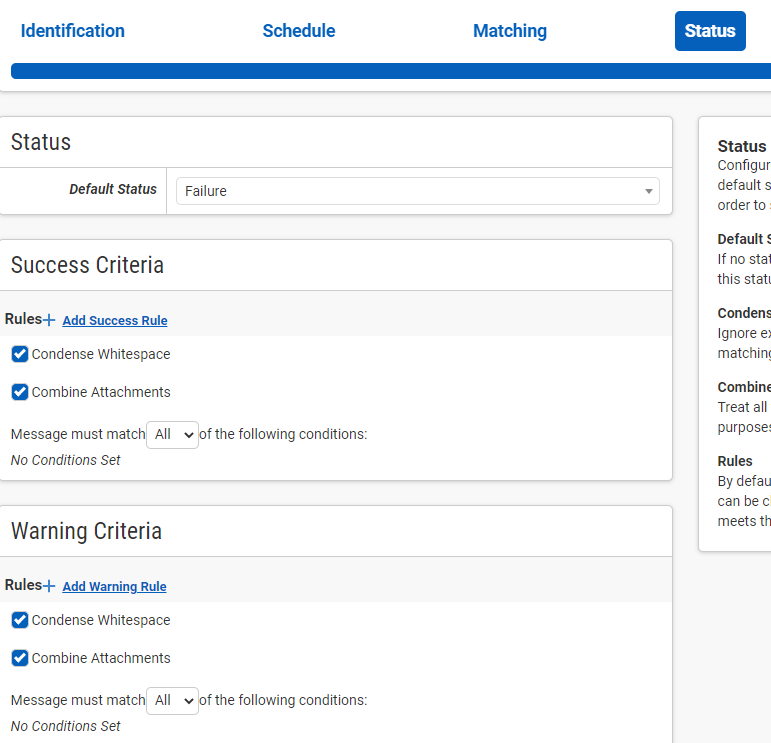
The previous Matching step identifies the incoming email to the Check. The Status step looks for indicators of what type of notification you're receiving (i.e. The backup job was successfully run, it failed, or there were some issues.)
The configuration options you choose can vary considerably, but the approach is the same. The Default Status is what is set when the other Rules in this step don't match. Criteria for the remaining statuses then need to be defined, requiring their own unique one-to-one matches. If you consider a Warning a failure, then only a Success rule is needed. For each status, click "
Add [Status] Rule
" and populate the fields. Just like the Matching step, multiple rows of rules can be used.
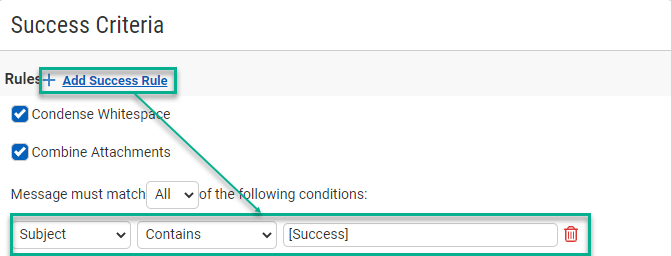
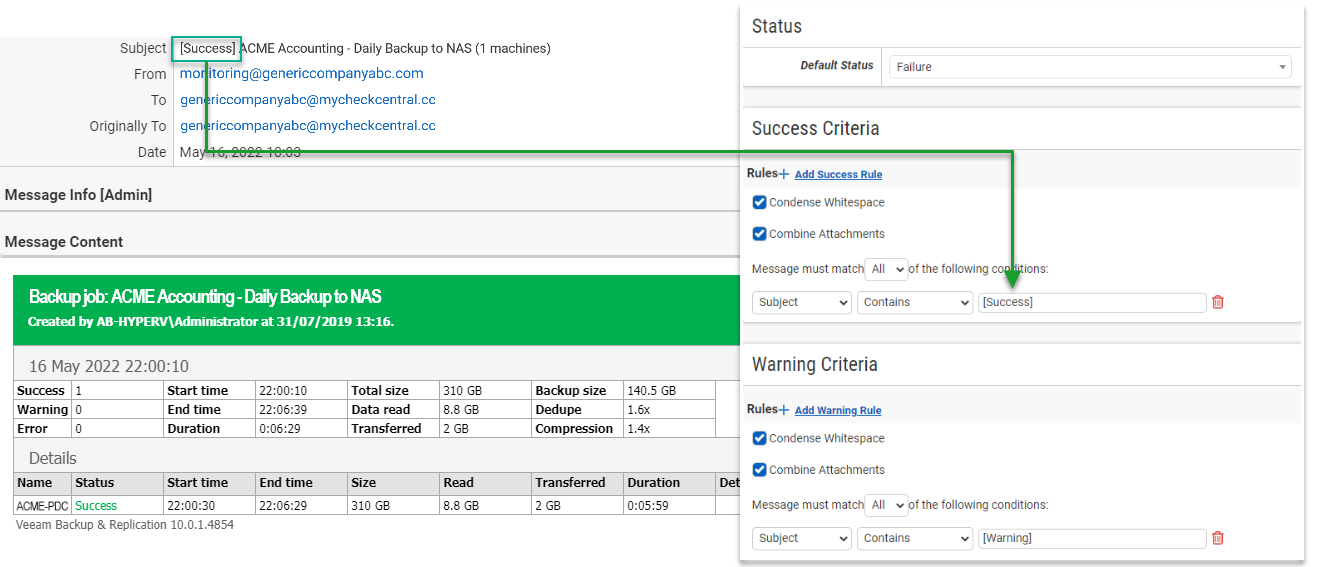
For this example, we keep the default status as Failure, which means we only need to define rules for Success and Warning notifications. Here we're going to make sure the three Statuses are distinctly defined.
For Veeam, the word "Success" is found several times within the notification email. Even on failures, the body of the message includes the term. The subject, however, prioritizes the negative Status even when multiple backups are reported in a single email. This makes rule creation simple.
For Successful notifications we create a rule in the Success Criteria section by clicking "Add Success Rule," selecting "Subject," "Contains," and typing "[Success]" in the text field. We create a similar rule in the Warning Criteria section.
We will leave Condense Whitespace and Combine Attachments enabled for this example.
Use matching elements that are exclusive to each Status and won't be found in the other Status notifications. Sometimes specifying a number of that Status is needed (e.g. 0 Failures). When in doubt, the final stage of Check creation allows you to test Check configurations against messages which can confirm an expected status match.
If matching is giving you trouble, try sending several relevant notification emails to the CheckCentral email used for your Check. They will come in as unmatched messages, grouped as such in the Current Issues section of your CheckCentral dashboard and listed in the Activities page as well. Use these as templates for configuring the Check, testing the Check against them until all statuses properly match.
Once your Check matches as expected, use it as a template for similar Checks you create. This is made easier as each Saved Check is available to copy later as shown in the beginning of the Check creation process. Another Veeam source for instance will keep the same Status rules, requiring limited modifications to the Identification and Matching steps. In most cases, it is best to leave Condense Whitespace and Combine Attachments enabled.
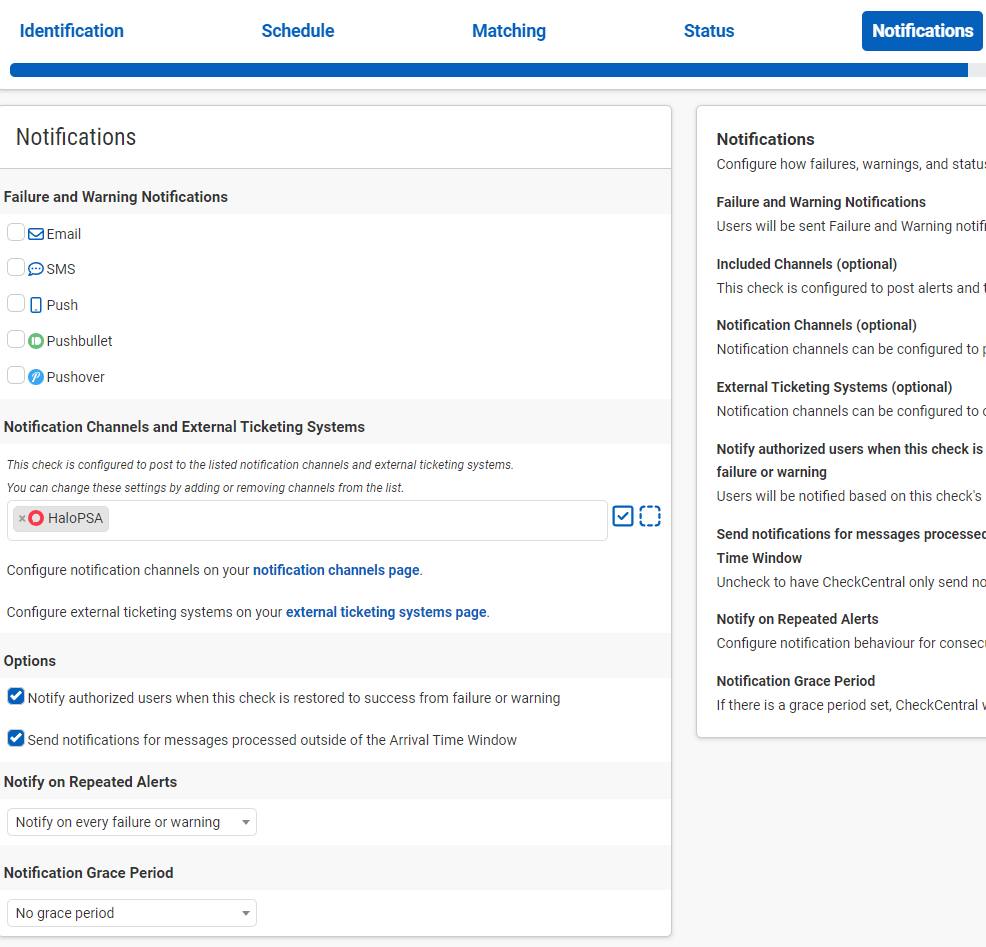
Notifications are simply how you want to be informed of Check Failures, Warnings, and some other Status changes.
Email, push, chat and other software can be integrated as well as ticketing systems, allowing for automatic ticket creation and management.
Further configuration is required for each to function and is done via the Notifications tab in the main menu. They can be configured before or after Check creation.
Enable the desired Failure and Warning Notifications as well as any Notification Channels and External Ticketing Systems to be used for this Check.
Other options in this step involve what to send and when to send it. The first option sends a notification for when a Failure or Warning Check returns to the Success state. The second option involves the Custom Schedule configuration from the earlier Schedule step. If you didn't use a Custom Schedule, this option doesn't apply. If you did, Notifications sent can be limited to the same Custom Schedule. This is achieved by disabling the option "Send notifications for messages processed outside of the Arrival Time Window."
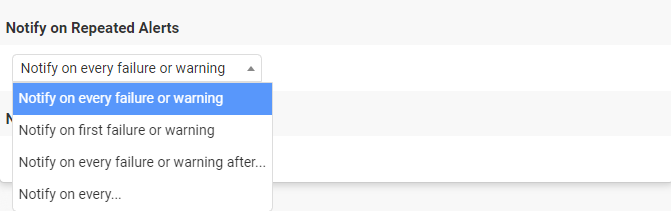
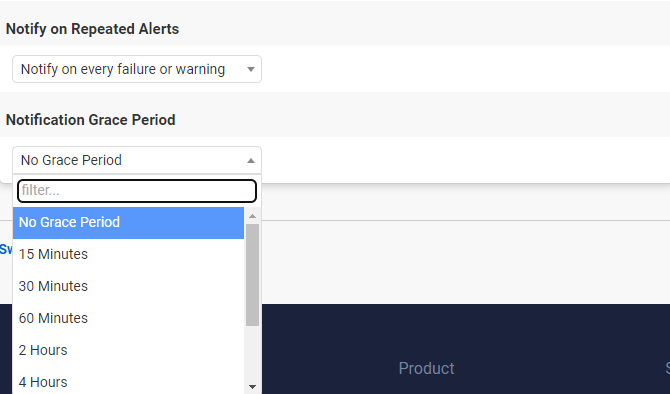
You may not wish to be sent notifications for consecutive Failures or Warnings on the same Check. The Notify on Repeated Alerts dropdown provides other options. You may also wish to delay Notifications. This is done through the Notification Grace Period dropdown, with options ranging from "15 minutes" to "1 day."
For this option we'll leave everything as the default.
Understand what your response procedures are prior to defining the various notifications. It may be unnecessary or inappropriate for some users to receive certain notifications. You may also want to establish notification channels exclusively used for CheckCentral.
Check both the Personal and Organization configurations under the Notifications menu tab to ensure the desired settings are enabled and configured correctly. Each has a test option, represented by the paper airplane icon.
Setting up your External Ticketing Systems prior to creating checks allows you to import customers and accounts as Check Groups for Check associations. (Not all Ticketing System integrations have this feature currently.)
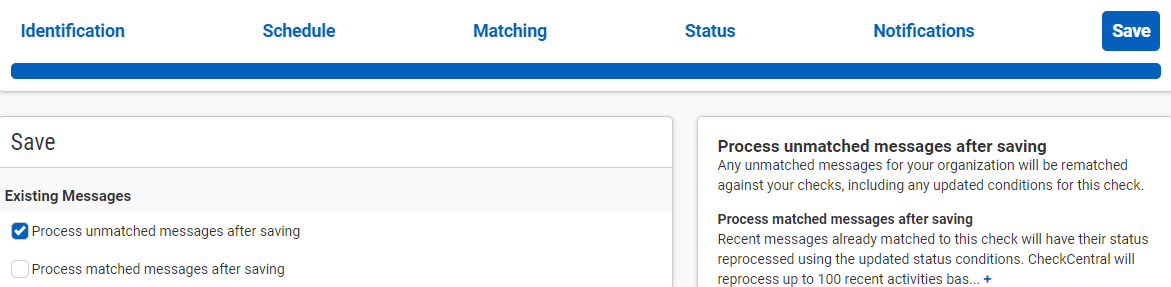
The Save step clearly saves your Check configuration, but it contains other important options. You may have already received notification emails as matched or unmatched messages in CheckCentral. You can enable the options to process one or both message types after the current Check is saved.
At the bottom of the Save step screen there is also the option to view the JSON of the Check. This is useful when writing API scripts for more efficient Check creation.
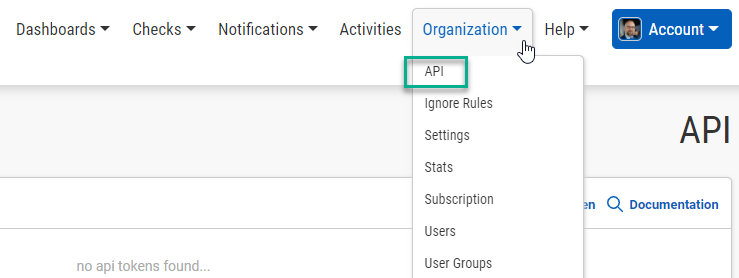
For API token creation, documentation, and testing, go to the Organization tab and click API via CheckCentral's main menu.
For further documentation on the CheckCentral API and Check structures, see
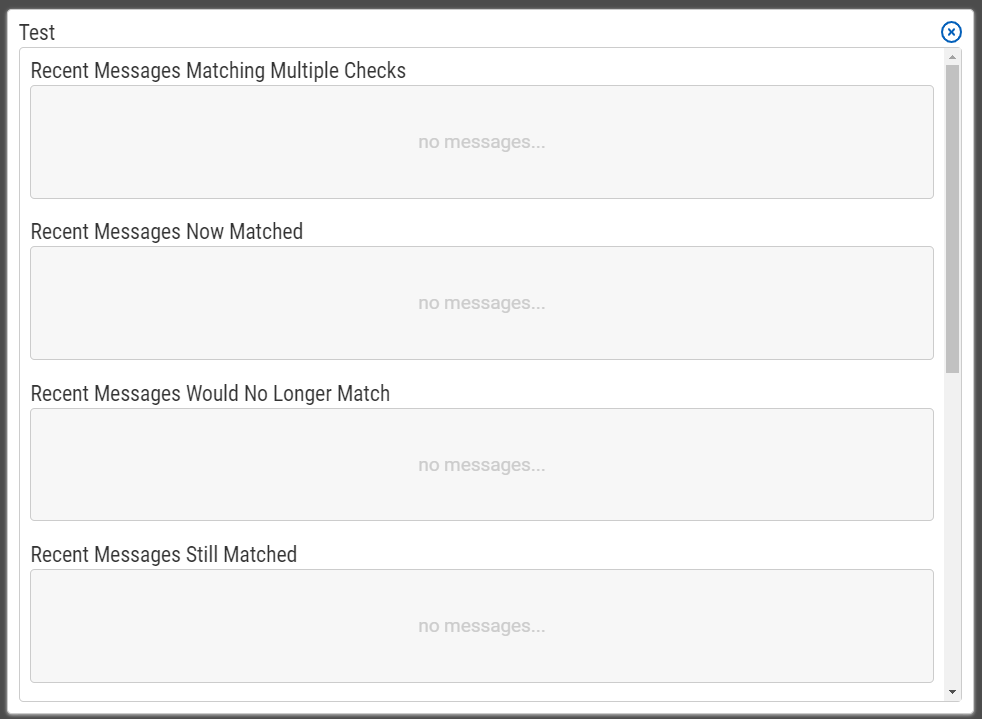
API DocumentationTo test the Check against all email messages CheckCentral has received, whether they have matched Checks or not, use the Test button.
By clicking the Test button you will be shown which Messages match your recently-created Check and what their status will be based on your defined criteria. The headers of each message section give more detail.
If you have yet to receive any messages from your sources, or when finished testing, click Save Check.
For this option we'll leave everything as the default.
Our Check is now saved and appears on our main Dashboard.
The CheckCentral side of Check creation is done. If you haven't already, go to the source which sends the notification emails and update the destination address to match what was used in Step 3, Matching. That's it! Your first Check is configured and being actively monitored by CheckCentral.
See below for Troubleshooting.
After a message is processed by CheckCentral, confirm it matches the correct Check and is set to the correct Status. To expedite this confirmation process, send the email message prior to creating the Check.
If your Check fails to match a message, review your matching rules in the Matching tab. See
Best Practices under Step 3: Matching above.
If your Check Status is not set correctly (i.e. It shows as Failure when it should be set to Success), review your criteria in the Status tab. Ensure each Status area is well-defined. Alter your text and/or the matching dropdown options. Then use the Test button in the Save tab until the results match the message with the correct Status. See
Best Practices under Step 4: Status above.
Try starting with an unmatched message first. Send your notification email to the CheckCentral email address (default organization name or with specifics).
Then search for "Unmatched" messages in the Activities page by clicking on Activities in CheckCentral's main menu, then selecting "Unmatched" from the Matched dropdown, and clicking the Filter button.
Clicking "
[create check]
" in the row with the unmatched message will pre-populate the Identification and Matching steps (in part), which may help, though these fields will likely need modifications (i.e. Removing "[Success]" from the Name and Matching Rule text fields as shown in the example image).
*Examples were accurate at the time of writing. It is advised to confirm continued accuracy on your own Checks.
Veritas – Default Status: Failure; Success Criteria: Subject, Contains, Success; Warning Criteria: Subject, Contains, Warning
Comet - Default Status: Failure; Success Criteria: Subject, Contains, Success; Warning Criteria: Subject, Contains, Warning
(See
this document for configuration on the Comet side.)
The CheckCentral API provides an endpoint for creating checks programmatically using JSON. For API token creation, documentation, and testing, go to the Organization tab and click API via CheckCentral's main menu.
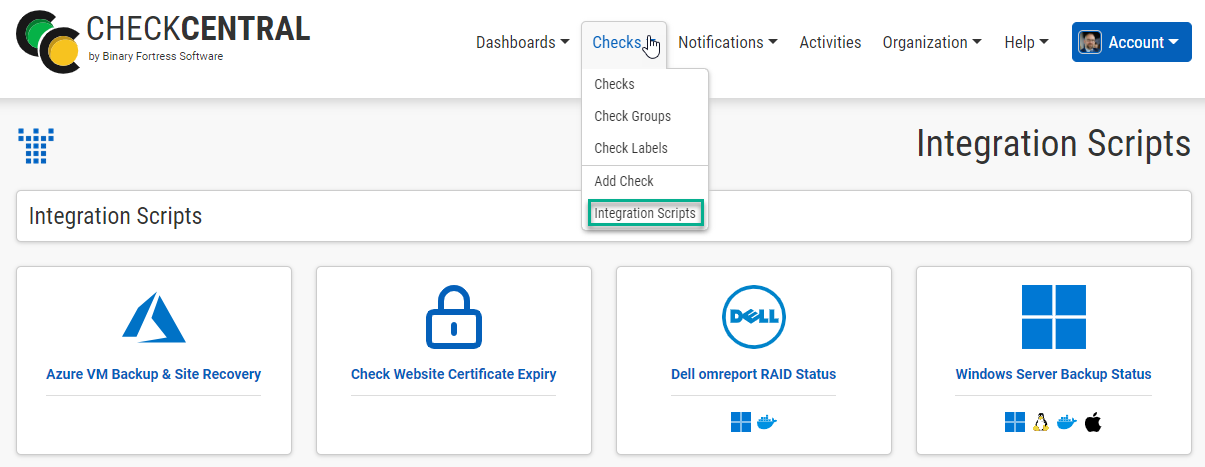
The Checks below are used in conjunction with our integration scripts and require additional setup. Go to Integration Scripts under the Checks tab of the main CheckCentral menu and click the relevant button for instructions and the script download or click the link provided below.
Some users create Checks that have no associated notification emails or matching rules. Using the Schedule configuration, these manual checks are simply reminders of activity that should be carried out on a regular basis. The end user is sent a warning and/or failure based on the Expected Interval, then updates the Check to show the action was carried out.
Create these Checks as you normally would for the Identification, Schedule, and Notifications steps, leaving all other configurations blank.
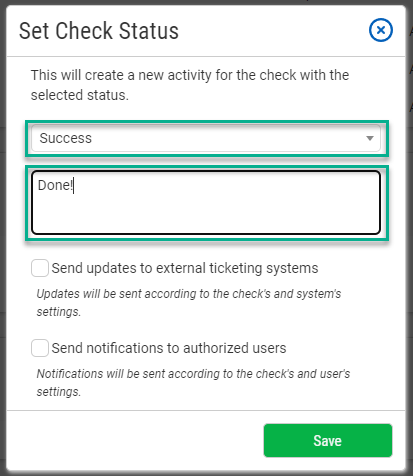
Once the Check is created, you can update its Status from the Dashboard.
Click on the check mark to the right of the Check.
Set the Status, type a relevant message, choose if updates/notifications are to be sent, and click Save. The Status will be added with the appropriate color-coded circle, containing an icon to indicate it was manually set
.
Succeeded, Successful, Successfully, Completed, Finished, Critical, Error, Fail, Failed, Attention, Missed, Canceled, Cancelled, Action Required
Your Check matching criteria should exclude irrelevant messages (the source may send notifications for configuration changes or new logins or redundant summary reports, for example), though CheckCentral will still retain these Unmatched Messages.
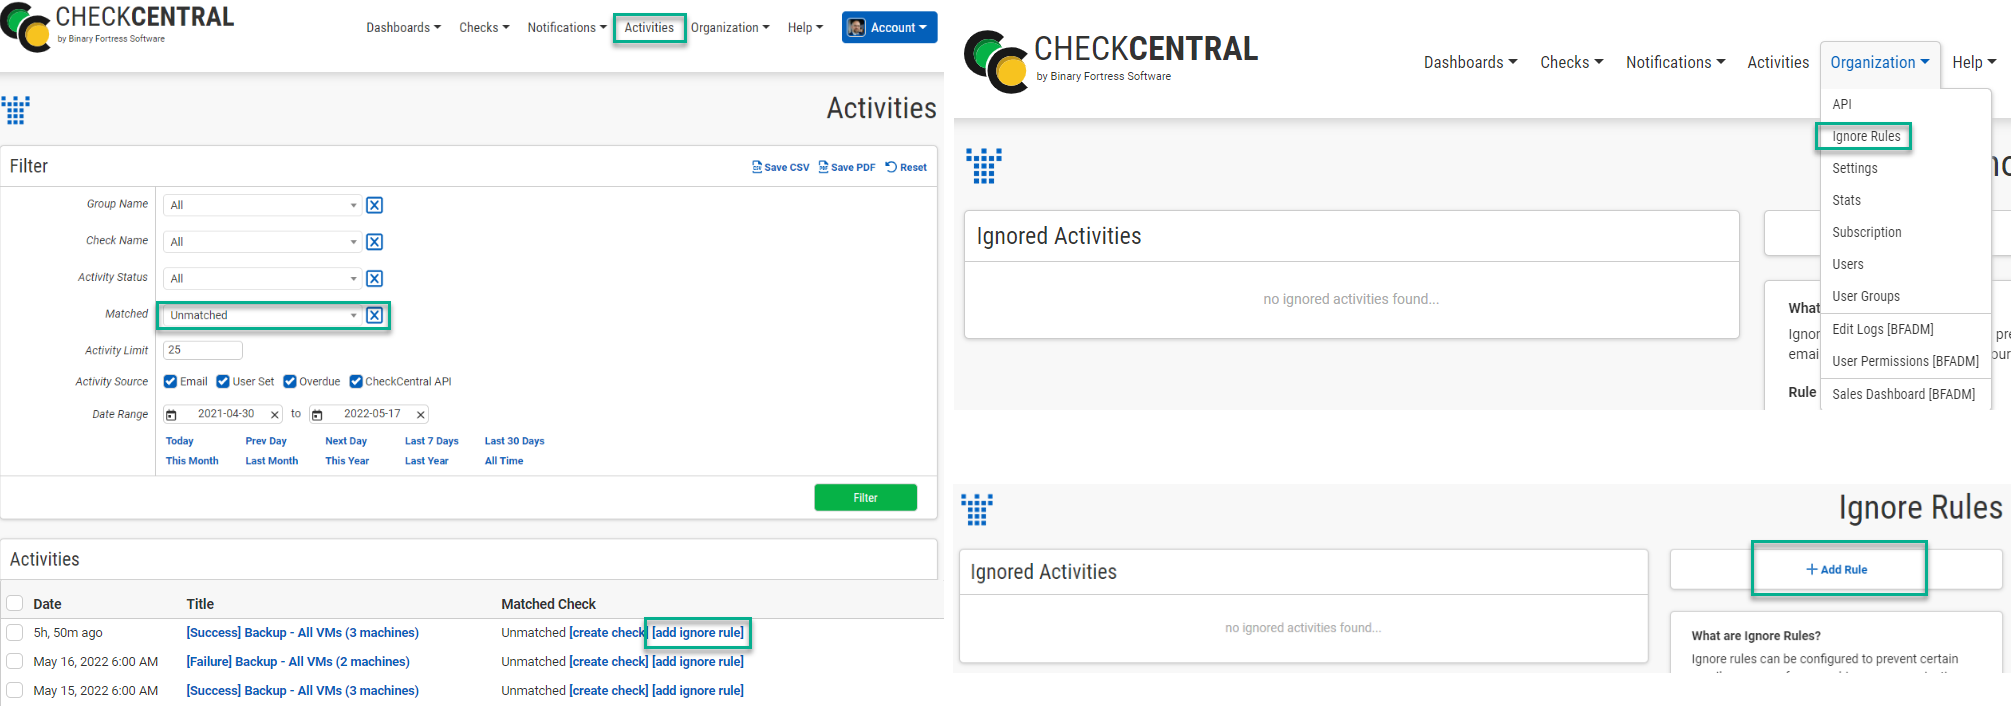
To avoid possible Check matches resulting in false Status updates, or even just to remove Unmatched Message clutter, you'll need to create Ignore Rules. You can do this from the Activities page on unmatched messages or through the Organization tab of the main CheckCentral menu. Click "
[add ignore rule]
" from the Activities page in the row with the Unmatched message you wish to ignore or click "
Add Rule
" from the Ignore Rules page.
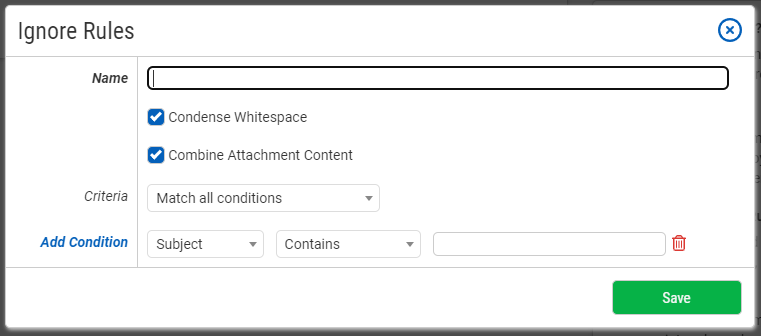
This is a simplified version of the Check creation process, condensing the criteria requirements to matching the message text/attachments and/or the sending/receiving email addresses. Multiple rows can be added by clicking "
Add Condition
."
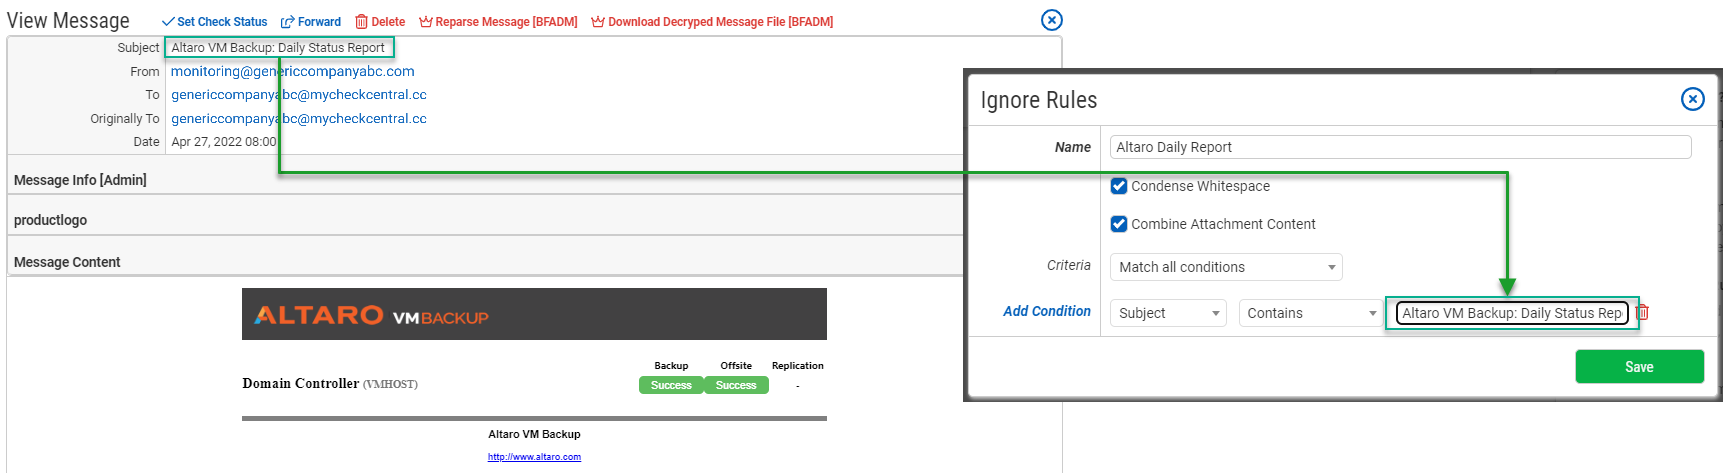
In this example we'll add an ignore rule for Altaro's Daily Status Report.
We click "
Add Rule" from the Ignore Rules page. In the presented screen we name the rule "Altaro Daily Report." For the condition we select "Subject," "Contains," and type "Altaro VM Backup: Daily Status Report" in the text field. We then click Save.
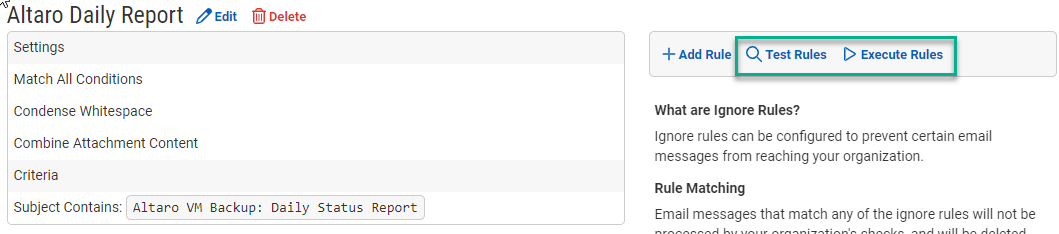
Clicking Test Rules is similar to the Test screen in the Save step of Check creation. This will show you which messages match the existing Ignore rules. If the intended messages match as expected, clicking Execute Rules will apply the Ignore rules to them.
Use matching elements that are consistent with and exclusive to the email messages you wish to ignore, making sure nothing overlaps with other rule criteria. Create multiple condition rules to be certain.
CheckCentral Monitoring consolidates and simplifies backup, system, and software email updates into a clean, graphical dashboard, bringing peace of mind to IT administrators of SMBs, Enterprises, and MSPs.
To learn more about CheckCentral, visit:
https://www.checkcentral.ccBinary Fortress has spent 19 years in pursuit of one goal: create software to make life easier. Our software ranges from display management and system enhancement utilities to monitoring tools and digital signage. IT administrators, professional gamers, coffee-shop owners, and MSPs all rely on Binary Fortress to make their days better, and their lives easier.
Copyright © 2007-2026 Binary Fortress Software, all rights reserved.
The Binary Fortress logo is a trademark of Binary Fortress Software.
The CheckCentral logo is a trademark of Binary Fortress Software.
Binary Fortress Software
1000 Innovation Drive, Suite 500
Kanata, Ontario, Canada
K2K3E7
https://www.binaryfortress.com